It's not unusual for the four edges of an unfinished quilt top to all be slightly different lengths because the edges of quilts are often stretched out of shape a little during construction.
These instructions for measuring and sewing straight borders to a quilt can be used to add any type of border that won’t wave when finished.
Straight Sewn Borders
Straight-sewn quilt borders, also called butted borders, are quick and easy to sew—that's probably why they are the most commonly used borders for quilts.
Borders are usually sewn to the two longest sides of the quilt first and then to the remaining two sides with the final two extending straight across the ends of the first borders.
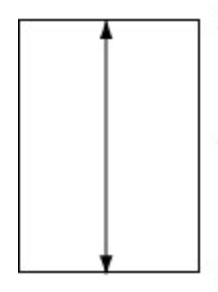
Measure the quilt from top to bottom through its vertical midpoint.
Cut two border strips that match the measurement exactly, using the width you've already determined looks best with the quilt. Borders made with crosswise grain strips are somewhat more stretchy than lengthwise grain border strips, but either type is suitable.
Piece border strips end-to-end to achieve length. Strips lose 1/4 inch for each seam it takes to stitch them together, so allow the appropriate extra length when cutting. Sew the strips together along their ends, press seam allowances open to reduce bulk, then trim the strip so that its length matches the measurement in Step 1.
How to Sew the Borders to the Quilt
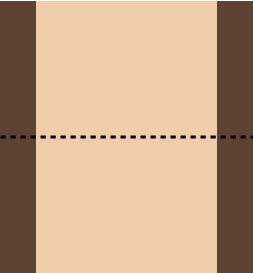
a. Fold one of the borders in half crosswise to find its midpoint, using your fingers to crease it slightly at that spot. Find the quilt's horizontal midpoint.
b. Place the border along the side of the quilt, right sides together, and midpoints matched. Pin through both layers at the match to keep fabrics from shifting.
c. Match and pin the bottom end of the border to the bottom edge of the quilt, then match and pin the other end of the border to the quilt.
a. Continue matching and pinning the border to the entire side of the quilt, pinning at close intervals if you must ease in fullness to coax the two lengths to match. Raw edges should be aligned along the quilt's entire side.
b. Sew the border to the quilt with a 1/4 inch seam allowance. If you had to ease in fullness, sew with the longest piece on the bottom, next to the feed dogs.
c. Press the seam allowance towards the border.
d. Use the same method to sew the remaining border to the opposite side of the quilt.
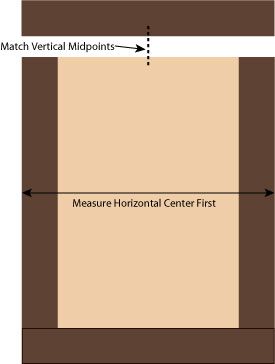
e. Measure the quilt from side to side through its horizontal midpoint, including the width of the first borders. Cut or piece two borders that length.
f. Fold a border in half crosswise and crease. Pin the midpoint of the border to the vertical midpoint at the top of the quilt, right sides together, and raw edges matched.
g. Continue matching and pinning the border to the quilt just as you did side borders, working with ends first then matching and pinning the remaining length.
h. Sew the border to the quilt with a 1/4 inch seam allowance. Press the seam allowance towards the border.
i. Repeat to sew the remaining border to the quilt.
j. Repeat all steps to add more borders.
If you prefer mitered borders, the base directions are the same, but the lengths that you cut and the way that you finish the corners are different. There is a good tutorial on the Quilting Daily website, and you can find that here:
As always, we want to provide you with a fantastically quilted quilt. That all starts with a fantastic quilt top. Wavy or full borders make the quilter’s job of giving you a perfectly quilted quilt much more difficult.